Apart from the Soundplayer, the Mixer is one of the most important tools of UltraMixer. It enables you to vary volume, sound and sound characteristics of a title. The Crossfader enables you to switch softly between the Players.
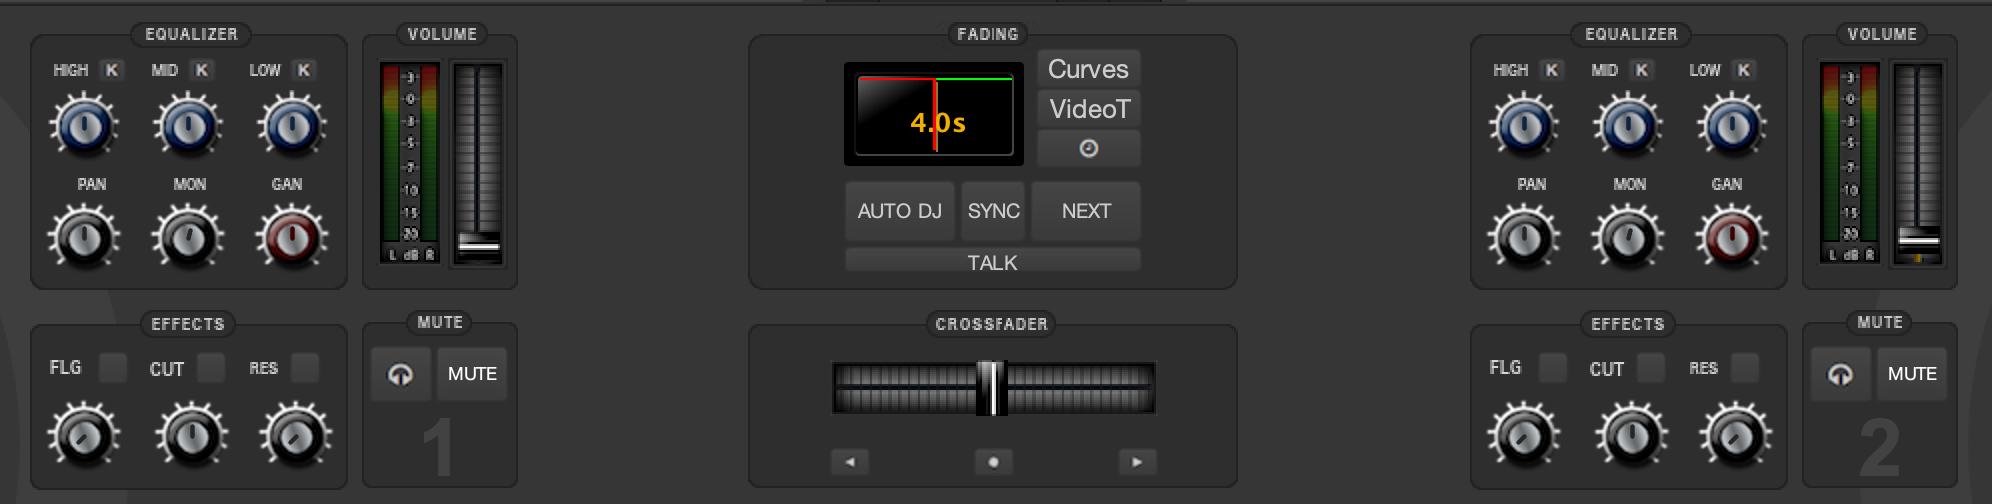
Fading Section
Crossfader
Mute & Headphones
Volume Section
Equalizer
Effect Section
1. Fading Section #
The Fading section defines how the volume of both Players is blended. The red line shows the volume of the left Player, the green line shows the volume of the right Player. A high value of a curve symbolizes a high volume, a lower value symbolizes a lower volume. The example above shows the following situation: If the Crossfader is moved from the left to the right, the volume of the left Player is lowered in a linear way until there‘s nothing to hear any more (red line). At the same time, the volume of the right Player increases in a linear way (green line). It‘s due to the example above that the Crossfader got its name.
Fading Curves #
- A left-click on one of the four curves will activate the appropriate Fading Mode. The selected symbol will be colored.
- If the manual mode is activated, both lines can be adjusted with the help of the mouse, and the degree to which the volume changes can be defined.
Below the display is a fading slider. With the help of this slider, you can determine the duration of the automatic fading.
Auto DJ #
This button is especially interesting when UltraMixer is being used as a jukebox (e.g. in bars or restaurants). If the Auto DJ function is activated, the titles of both Playlists will be mixed automatically by the software. Before a title ends, the next title in the other Player starts playing automatically and is blended in with the help of the Crossfader (the speeds of the songs are not adjusted). The result is a music mix without breaks, and you don‘t have to deal with UltraMixer all the time.
ℹ️ You can learn more about the Auto DJ in this article.
2. Crossfader #
The Crossfader is used to blend titles in both Soundplayers. The volumes of both titles are altered and put one above the other at the same time. This guarantees a music mix without any breaks. The function of the Crossfader is not limited to simple blendings. Techno and hip-hop DJs use this slider to fade in short samples of other titles, which makes the original title more interesting. The Mute buttons are also used to create useful effects. You can use them as you see fit.
Crossfader and Crossfader-Buttons #
The Crossfader enables you to switch between titles in Player 1 and Player 2 and vice versa. The kind of blending depends on the settings in the fading mode.
Functions
- Like the Volume fader, the Crossfader can be moved to the left and to the right by moving the mouse in that direction with the left mouse button pressed.
- Is the mouse cursor on the Crossfader, the scroll wheel can be used to move the Crossfader as well. By holding the Shift key, the reaction of the Crossfader is faster.
- A left-click in the slider area changes the volume relation between both Players immediately
- A left-click on the “Left” or “Right” button moves the Crossfader automatically.
- A left-click on the “Middle” Button sets the Crossfader in the middle position. Generally, both Players will play with the same volume level in this position (depending on the Fading Mode).
3. Volume Section #
The Volume slider is used to change the volume quickly or to produce soft fadings bet- ween both Soundplayers. Techno DJs tend to leave the slider at the maximum volume position (100 percent). They mainly use the Gain slider in the Equalizer section to increase or decrease the overall volume of a title.
Volume slider functions:
- Moving the slider upwards or downwards with the left mouse button pressed increases respectively decreases the volume.
- It is also possible to alter the volume by pointing the mouse on the Volume slider, and using the scroll wheel of the mouse. If Shift is pressed at the same time, the volume will change in bigger steps.
- A left click in the slider area will lead to an abrupt change of volume.
- Like all sliders the Volume slider can be set back quickly to its standard value by using the mouse. A right click or a double left click will set the slider in the maximum position.
ℹ️ If you want to alter the volume for a short moment only, you can use the following function of the slider: Press Shift + left click on any position in the slider area. The slider moves to this position immediately. As soon as you let go of the mouse button the slider moves back to its original position. If you use the right mouse button (without pressing any key) instead the slider moves back to the maximum position.
4. Mute- and Monitor-Button #
The Mute buttons mute or unmute the Players.
Mute-Button functions:
- A left-click on the Mute button of a Player activates the Mute function.
- A further left-click deactivates the function. The monitor button is useful to pre-listen a Title during the other player is playing.
Prelistening Preparations
• Go to the UltraMixer Preferences > Audio > Soundcards
• Select the rear channel for monitors 1 and 2
• Select the front channel for players 1 and 2
• Now put the headphones in the rear channel and the speaker in the front channel
Monitor-Button functions:
- Load a title in the waiting player and start the song
- Activate the Monitor button (of the Player with the title to pre-listen) with a left-click.
- Now, this monitor channel is active; the button shines.
- You can influence the volume in your headphones with the Monitor knob
- A further left-click deactivates the Monitor channel.
- A further left-click deactivates the function.
4. Equalizer #
The Equalizer knobs influence the high (“High”), middle (“Mid”), and low (“Low”) tone frequencies of a title playing. Example: If the high frequencies of a title are too loud, it is possible to lower the volume of these tones with the High knob. The EQs are also used for other functions. Often, they are used to stress certain passages of a title.
ℹ️ Generally, all sliders are set back to their standard positions after loading a new title. This function can be deactivated in the Preferences. In that case, the sliders won‘t move from their last position.
Panorama knob
The Panorama knob (Pan knob) influences the balance between the right and the left stereo channel.
Monitor knob
This knob controls the volume of the monitor channel.
Gain knob
The Gain knob is used to increase or decrease the volume of a title. This function enables you to adjust the volume of a title before you start playing it. The position of the Gain knob influences the volume level which is adjusted with the help of the Volume slider.
Using the knobs:
- Click on the requested EQ knob with the left mouse button, keep the mouse button pressed, and move the mouse up and down (standard setting, can be adjusted in the Preferences)
- In case the mouse points on a knob, you can use the scroll wheel of the mouse. If you press the Shift key at the same time, the knob moves faster
- A right-click or a double-left-click sets all sliders back to their standard positions
Kill buttons
The “K”-Buttons enable you to cut the appropriate frequencies completely.
Using the Kill Buttons:
- A left-click on the “K”-Button activates the corresponding Kill area. The button shines. A further left-click deactivates the function.
- A right-click on a “K”-Button activates the Kill function for the duration of the click.
5. Effect Section #
With the help of the Effect Section it’s possible to influence the sound characteristics of a title in real time. At the moment, UltraMixer contains the following standard effects: Flanger, Cut-Off, Resonance.
ℹ️ Generally, all knobs are set back to their standard positions after loading a new title. This function can be deactivated in the Preferences. In this case the knobs won‘t move from their last position.
Using the Effect Buttons:
- A left click on the Effect button activates the corresponding effect. The button shines.
- A further left click deactivated the effect.
- A right click on the button activates the effect for the duration of the click.
Using the knobs:
- Click on the requested effect knob with the left mouse button, keep the mouse button pressed, and move the mouse up and down (standard setting, can be adjusted in the Preferences).
- In case the mouse points on a knob, you can use the scroll wheel of the mouse. If you press Shift at the same time, the knob moves faster.
- A right-click or a double left click sets all sliders back to their standard positions.


